Thursday, December 27, 2012

After-Christmas Decorations

Who likes what their house looks like after they take all the Christmas decorations down? 
No one. 
(Okay, except maybe my one friend who considers her Christmas decorations "clutter" and takes them down as soon as possible.)
But not me! I'm determined to work on some decorations that I love to have up for the month of January! So look for something soon...I'm working on it, and here are some of the elements below. 

Wednesday, December 12, 2012

Gift Card Packaging

Looking for a cute, inexpensive, and easy way to wrap up some Christmas gift cards? I took each gift card, placed it in a clear plastic treat bag, added some Hershey's Kisses, and sealed them up with some ribbon and a jingle bell!

Happy Holidays!


Tuesday, December 11, 2012

Craft Show Fun

Today my sister and I setup for a show at a local retirement village. It was the first year they offered the "marketplace" to their residences, so traffic was pretty slow. It was still fun to hang out with my sister for the day and meet some new people!


Sunday, December 9, 2012

A Little Mantel Love

Today I went over to my sister's house for lunch and ended up helping her decorate her mantel for Christmas. I do have a little mantel-envy due to my lack of mantel (I know, I whine about that a lot...I'm sorry).

All of the glassware she had somewhere around the house, and we filled them with ornaments and some silver and white filler from Michael's. The cute little "let it snow" sign in the middle was in the $1 bin! Her super cute skate stockings were a gift from her sister-in-law from Canada. 

The best news about this mantel? All she has to do is take down the stockings, and it can stick around until Valentine's Day!


Saturday, December 1, 2012

Monday, November 12, 2012

Business Time.

It's open for business! Come visit me :)

www.etsy.com/shop/AbbyJanes


Saturday, November 3, 2012

Decorating for Fall.


Happy Fall!

I FINALLY got a shelf up in my living room to serve as a mantel substitute. (I don't have a mantel- I'm pretty sad about it.) I threw some pumpkins up there with some leafy garland, a few mirrors with wooden frames, and a new block letter set I made. I also made the wreath below to hang on the front door. So excited to finally be able to decorate for my favorite season!


Wednesday, October 31, 2012

The Calm After The Storm.

Well, you know you've been under a lot of stress lately when your trip to the store on Monday afternoon looks like this:


But really, I'm feeling better already. I think it was just my body saying 'really, Abby Jane? 2 showers, a new job, and a craft show all in the same month? get outta town.'

So speaking of craft shows...her she is!


I realize the picture is a little small but so was my space! A few important things I wanted to keep in mind for the show:

1. I wanted to offer the majority of products I make (headbands, hair clips, tie bibs, block letter sets, and yarn wreaths) to see if I noticed any particular difference in sales. I think I would eventually like to narrow down what I have to offer, so I thought this show might be a good starting point. Unfortunately, I saw people buy a little bit of everything! No one item was particularly popular, although I did get a TON more comments about my cute tie bibs. (I did find out there was another vendor selling them. Fortunately she was in another building. And one customer told me she wished she would have found me first- mine were cuter. Bonus.)

2. I wanted to offer items at a variety of price points. My items ranged from $1-$40. I found this to be effective.

3. I also offered discounts for multiple purchases. Almost every item on my table was sold at a lower price if you bought more than one.

4. I also found that no matter how many signs you make stating your prices, people will always ask you. Know your prices very well!

5. I also value pretty packaging. I discovered that about myself in preparing for the show. So did I spend a little extra money? Yes. Did my shoppers go home with a little extra "wow" factor after their purchase? Yes! Several of the items purchased were gifts so I was able to add gift wrapping at the end. I think my customers really appreciated it! I simply bought some reusable shopping bags on Amazon (for larger purchases like wreaths) and just some plain colored craft bags at Michaels- added my business card tied on with zebra print ribbon & a little tissue paper, and that was that! 

Here is what I went with:
18 headbands ($6 or 2/$10)
10 infant headband wraps ($1 to add to any hair clip)
7 small flower clips ($3 or 2/$5)
22 large flower clips ($4 or 3/$10)
13 tie bibs ($4 or 3/$10)
10 block letter sets (varied from $4/letter or 3/$10 to $10-$20 per set)
6 14" wreaths ($40)
3 12" wreaths ($25)

And here is what I came home with:
16 headbands
6 infant headwraps
3 small flower clips
14 large flower clips
5 tie bibs
5 block letter sets
5 14" wreaths
2 12" wreaths

Also came home with custom orders for 1 tie bib, 1 onesie, and 1 14" wreath.

So excited to get product pictures taken this Saturday and hopefully having all of these items up on Etsy by mid next week!


Thursday, October 25, 2012

It's Go Time.

I couldn't have asked for a better week. While each night I have still gone to bed with items on my to do list, the timing of everything has worked out remarkably well. Dinner at my sister's on Tuesday night = brother in law preparing all of my wooden blocks for me. Friends having Halloween pictures taken last night = last minute phone call to me to bring some product over for a photo shoot.

So while dinner with my nephews and holding baby Ethan while they took the pictures weren't exactly on my to do list, I couldn't have asked for things to go better.

Only two more days until the show!

Sunday, October 21, 2012

Craft Show Prep

Getting ready for the show coming up next week! Just some last minute additions.

Thursday, October 4, 2012

Polka Dot Pumpkin

One of the things my friends got for me last week was a pumpkin from the farmer's market. I know, kind of a weird request for my birthday, but we were at the farmer's market...and I just wanted it, that's all. When it's your birthday, you get what you want, right?

I came home and spiced it up a little bit. I used a round foam brush and acrylic paint to make the dots, and then I used a white Sharpie pen and free-handed the "A". I had to do a couple layers of each for it to really stand out, but I think it turned out pretty well. I then added a cute bow on top and set it out on my front porch!


Saturday, September 29, 2012

Abby Jane

Happy Birthday to me!

Wanna know how old I am? I'll tell ya. I might not in a few years, but I will this year. 
I turned the big 2-7 today. 
I got a lot of great gifts from my friends and family, but I wanted to share just one! One of my friends, in anticipating my upcoming craft show, made this utility apron for me and had her mom embroider it with my name! How cute is that?! The apron is also great to have at home if you're working on a project and need to have a lot of tools on hand. 
Thanks, friends, for giving me a great week of celebrating!
Love you all. 
 

Tuesday, September 11, 2012

Football Season is Here!

I'm a big OSU fan. I wanted to think of some ways to decorate that weren't generic or used the usual OSU symbols. In other words, I wanted to use my crafty creativity to come up with something different! So I pulled out some white letter stickers, scrapbook paper, wooden blocks, Mod Podge, and ribbon and was able to come up with a cute letter set to sit on my shelf throughout the football season!


I also made a couple yarn wreaths for the craft show coming up.


GO BUCKS!

Tuesday, August 28, 2012

Back-to-School Treats

Looking for a cute and easy way to spice up some treats? Use some scrapbook paper and ribbon and attach it to the top of the sandwich bag! I made these cute Swedish Fish treat bags for the ladies on my leadership team. I love having a treat at their seat for our meetings!

Sunday, August 19, 2012

All Seasons Wreaths

I have a few friends that are nothing like me. They do not look forward to decorating for each season and probably sort of wish people like me didn't exist. They like their house to look nice, but they don't like the hassle of changing for each season!

I created these two wreaths with them in mind. Both of them are super cute, but they aren't connected to any particular season. They can stay up all year long or, if you're like me, they can be used as fillers between seasons ;)


Wednesday, August 8, 2012

Lightsaber Summer Fun

About every other week this summer, I've been taking a day off work to watch my nephews for the day. It's been fun getting to spend some time with them and enjoying the summer!
 
Today was the last day because they head back to school next week. I wanted to come up with a few fun things for us to do. We went to the library for a while and picked out some books, played with the puppets in the storytelling area, and practicing our inside voices. ;)

Then we went to a few stores and picked up the supplies we needed to make some lightsabers! 
(Yes, they still eat, live, and breath Star Wars.) All we used were 2 pool noodles, duct tape, electrical tape, and painter's tape (although I'm sure even a blue Sharpie would work). 

We had a great day! 
And the best part of these? They don't hurt nearly as much as those plastic ones when they hit you!


Sunday, July 22, 2012

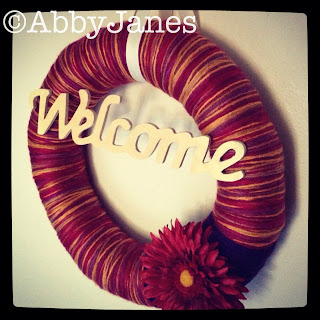
Welcome Yarn Wreath

Getting a head start on some items for my craft show coming up in the fall! 


I used a multi-colored yarn (no, I did NOT wrap each color individually like one friend suggested) to wrap the wreath and then a coordinating deep purple for the band. I popped that daisy flower off a stem and hot glued it to the wreath. The welcome sign is made of wood. I sprayed the wooden sign with spray adhesive, placed it upside down on a piece of scrapbook paper, and used an Exacto knife to cut the paper to size. I then used a small file to smooth the edges and added a layer of Mod Podge to keep it smooth. I like how it turned out! I also think it could be used for spring, fall, or both!

Tuesday, July 17, 2012

4th of July Madness

For some reason this year, I was obsessed with 4th of July decorations! However, I was completely bummed because I was going to be out of town and wouldn't be able to have a party. Long story short, my plans changed last minute, but I didn't have time to throw a party together!

Until I came up with this brilliant idea. 

I decided to throw a 4th WEEK of July party! It also served as sort of a come see my house/buy some jewelry from my sister party. (It was a big night!) I had a great time hosting all of my friends in my tiny little place and making some yummy, red-white-and-blue foods and decorations!


Tuesday, June 19, 2012

Scripture Alphabet Book

It seems like everyone I know is having a baby.
Okay, not EVERYONE, but a LOT of people I know. 
I'm a working woman, but shopping for all of these babies can get expensive!

Here is my go-to gift for new moms:
Scripture Alphabet Book


I bought the graphics as a set on Etsy. I then went through the (somewhat painstaking) process of printing, cutting, trimming, pasting, laminating, punching, and stringing the pages together to complete the book. Depending on how many books you make, the intensity of the labor that goes into this project could be worth it in the end! I think I've made at least 5 of these and will have plenty more to make by the end of the year.

Wednesday, May 23, 2012

Desk Makeover

In preparation for my upcoming move, I've been working on putting together some pieces for my bedroom. I scoured Pinterest for some DIY furniture redo tips and was inspired!

My brother brought this desk over a while ago in exchange for the beautiful roll top desk I was originally going to paint. (He thought it was a crime- I didn't see a problem with it.)


Here is the finished product!


I purchased the white and brushed nickel pulls from Lowe's, and the zebra print knobs from Hobby Lobby. I never realized how expensive knobs and pulls are! I could have gone with a more generic look and been able to buy them in a pack, but I couldn't resist adding a little zebra flair. Even with 50% off the knobs from Hobby Lobby, I still think I spend about $20 on knobs and pulls and $10 on paint and primer. The desk was free, so I guess $30 total isn't too bad! I also had PLENTY of paint and primer left over, so it will be used for other projects.

Thursday, May 10, 2012

Storage Canisters

Storage canisters can get expensive. I wanted to personalize them anyway, so I tried to make them as cheap as possible! I purchased the jars at Hobby Lobby while their glassware was 50% off. (Make sure it says on the bottom that they are food-safe containers. This isn't true for all of them! They also need to be air-tight.) I then set to work on my Cricut machine. I used the "Old West" cartridge and cut out each letter. It was a little tedious, especially applying them to the jars, but I love how they turned out! I love leaving them out on my kitchen counter for their own decoration!

Sunday, April 22, 2012

Happy 5th Birthday, Jayden and Regan!

Happy Birthday, boys!

At this point in time, Regan and Jayden are Star Wars obsessed. I don't mean they kind of like Star Wars- I mean they eat, live, and breath Star Wars. My sister asked them what they wanted for their birthday cake, and they said they wanted Auntie Abby to make them some Star Wars cake pops!

I've made all sorts of cake pops before, but I have to admit- I wasn't quite sure where to go with them. I looked at some ideas on Pinterest but decided I'd see what I could come up with on my own. 
The challenge began!

I used my usual recipe for cake pops, but instead of rolling them into balls, I formed them into more of a bell shape and dipped them in white candy melts. I have never had much success with edible writing markers (Bakerella claims they work, but I'm sorry- not for me!), so I had to find a new solution for the black marks to make them look like stormtroopers. I ended up using an edible gel, but it was still difficult because the gel seemed resistant to the candy melt coating. Oh well! It took a while, but I finally got it to work somewhat. 

So without further ado, here are the white stormtroopers!


I ended up with 10 stormtroopers and then made generic white and brown cake pops with colorful sprinkles to fill in. We had a great time celebrating the boys, but didn't think too hard about how we were going to fit candles into cake pops. We'll have to plan that a little better next time ;)

Happy Birthday, boys! 
Your auntie loves you so, so much!


Visit thecsiproject.com

Friday, February 24, 2012

Baby Shower Cake Pops

Some friends of mine were throwing a double baby shower and asked me to help with a dessert. Since one of them is having a girl and the other a boy, I had to think of something! 

I decided to make some upside down cake pops. I used pink candy melts for the girlie ones and polka-dotted them with pearl candy balls. I used brown candy melts for the boy ones and used blue candy melts in a squeeze bottle to drizzle over them.

Overall, I enjoyed making them for the shower! 
The guests loved them. 


Saturday, February 4, 2012

Create.

"The world doesn't need another band, per se. It doesn't, strictly speaking, need another book or another photograph or another album. The general world population will survive without one more stage production and one more gallery showing. 


This is the thing, though: you might not. We create because we were made to create, having been made in the image of God, whose first role was Creator. He was and is a million different things, but in the beginning, he was a creator. That means something for us, I think. We were made to be the things that he is: forgivers, redeemers, second chance-givers, truth-tellers, hope-bringers. 

And we were certainly, absolutely, made to be creators."
-Shauna Niequist

Tuesday, January 31, 2012

Crafting Secrets.

I've recently given people a lot of tips and tidbits on certain projects, so I thought I would add them here.

Not only do a love crafting, but- just like my momma- I love a good deal. Here are some ways you can make your money go a bit further and, in my opinion, have an even better result:


Tips for Yarn Wreaths

1. Buy a straw wreath. The green traditional Styrofoam wreaths normally run about $5 or $6 and are a lot more fragile than the straw wreaths. Straw wreaths are normally $3 and have a sturdy appearance. I originally went this route to avoid more yarn wrapping- which trust me, you'll thank me later!

2. Buy felt by the yard. Earlier this week, felt sheets were 50% off. Great, but so was felt by the yard. In the end, you get a lot more usable surface space and more felt for your money. I also, once again, found the felt by the yard to be better quality.

3. As my bestie found out earlier this week, a thicker yarn in the end will save you time and money. Even though those dental floss yarns are cute and sparkly, they are hell to wrap and don't cover much surface area. Also, always look for what is on sale and how many yards you are getting for your money. When it comes to yarn wreaths, the quality of the yarn isn't a big deal. You aren't going to war with it- you're just gonna hang it on a door or a wall somewhere!

4. Don't waste your money on the embellishments. When it comes to craft projects, you can end up spending more money than on something store bought if you let yourself get carried away. I haven't paid over $7 for all of my materials for any one wreath- shop the sales, clearance areas, and even your old jewelry box for brooches and earrings.

5. Have fun! Experiment! Try new and different things! Some of the weirdest ideas I've had have turned out surprisingly awesome. Mix fabrics, textures, cutting patterns- you'll stumble on something great!

More to come...